Cari Blog Ini

My Ping in TotalPing.com
Showing posts with label Cookies. Show all posts

Peppermint and Vanilla Butter Cookies

Written By Unknown on Thursday, December 8, 2011 | 7:58 AM


Just as wreaths, stockings and mistletoes signify the spirit of christmas, cookies and cakes do their part in spreading the joy all around. As the festival of christmas is just a few days away, people have started baking goodies and packing them in decorative tin boxes and wrapping papers, shipping them across to their loved ones and friends, wishing them joy and success in the days to come. Some flavors and smells reign the kitchens in these festive days, including, but not limited to chocolate, peppermint, vanilla, and of course, gingerbread! Joining in the fun and having found a reason to bake more often, I decided to go for a batch of these beautiful pink and white Swirl Cookies flavored with peppermint and vanilla. I love the candy canes and the beautiful ribbon patterns that they form, but I can't take too much of peppermint in one go. So here's the perfect solution, these basic sugar cookies, with a hint of peppermint and all the goodness of the lovely colors.

Ingredients
1 cup butter or margarine - softened
1/3 cup powdered sugar
1 tspn vanilla essence
2 cups all-purpose flour
1/4 tspn peppermint extract
1/4 tspn red food color

Method
Heat oven to 350°F. In a large bowl, beat butter, powdered sugar and vanilla with electric mixer on medium speed. Stir in the flour, then divide the dough in half. Stir peppermint extract and food color into one half of dough, while keeping the other part as it is.

Now again divide each color of dough in half (making 2 white and 2 pink parts).

Now take each part of the dough, and roll it on a generously floured surface into a thick cylindrical rope, about 12 inches long. Place 2 ropes, 1 red and 1 white, side by side. Now twist them together with your hands so they get entwined. Repeat with the remaining 2 pieces of dough.

Now make small balls from each double-colored dough, then shape each into a flat cookie shape. You can use a cookie cutter to give them shape, or just grease a steel bowl (katori) with oil and use this to give shape to the cookie. It should be fairly easy to do it with your hands too, just shape them like small cutlets.

Place them about 1 inch apart on ungreased cookie sheet. Bake the cookies for 10-12 minutes or until set. Remove from cookie sheet and allow to cool completely on the wire rack. There, your beautiful pink and white swirled cookies are ready to add a festive decor to your holiday baking!

Let's relive the spirit of Christmas; bake a batch of cookies and donate them to any organisation and then feel happy on seeing the smiles on the faces of little children. This is my contribution to the "Drop In and Decorate" event started by Lydia, and also to Susan's Christmas Cookies Event. There's no better time than Christmas to share the goodness around, and what better way to gift something than food?!!

Tip: You can store these Peppermint and Vanilla Butter cookies in an air-tight container and refrigerate them for longer use. But it's best to refrigerate the dough until you want to make the cookies rather than storing the cookies themselves.

Update: These beautiful cookies were not only selected as one of the top 10 finalists from over 212 entries in Susan's Eat Christmas Cookies event, it actually won the Best Christmas Cookie award!! Yipppeee!!! I am so thrilled!! Thanks so much to all the judges and my readers, friends, and family who picked out these cookies as the Winner! Thanks a lot to Susan, for organizing this fun event, and also for presenting me with a fabulous Sherry Yard's new cookbook Desserts By the Yard. Now you all can look forward to more delicious desserts on this blog!!

More Cookie Recipes:
Chewy Chocolate-Chip Cookies
Marshmallow and Chocolate Mud Cookies
Delicious French Madeleines
7:58 AM | 0 comments | Read More

Carrot Cookies- Healthy & Tasty Treats

Written By Unknown on Friday, May 6, 2011 | 11:15 AM

carrot cookies
With a toddler growing up in your house, you do end up baking cookies and treats a bit more often than you'd like, because no matter how healthy you'd try to feed them, sometimes, there is just no alternative to a cry for cookie:) luckily for moms like us, it is possible to introduce a healthier twist to your desserts too, just like these wholesome Carrot Cookies courtesy of Whole Foods. With amazingly nutritive ingredients like whole grain flour, oats, nuts, apples, carrot and banana, you will fell good about feeding them to your kids, and it would do no harm to sneak a couple bites for yourself too!

Carrot and Walnut Cookies
Makes about 24 cookies

Ingredients
1 cup raw unsalted walnuts
1 cup old-fashioned rolled oats
1 cup raisins
1/2 cup whole wheat pastry flour
1 1/4 teaspoons baking powder
1 1/4 teaspoons ground cinnamon
1/2 teaspoon ground ginger
2 carrots, grated
1 apple, grated
1 very ripe banana, peeled and mashed
1/4 cup apple juice

Method
Preheat oven to 350°F. Line 2 baking sheets with parchment paper.

Combine walnuts, oats and raisins in a food processor and pulse until finely ground. Transfer to a bowl and stir in flour, baking powder, cinnamon and ginger.

Add carrots, apples, banana and apple juice and stir until combined. Drop by rounded tablespoons an inch apart on the prepared baking sheets, making about 24 cookies.

Press down on each cookie with the back of a fork to flatten them slightly. Bake until tops and bottoms are lightly browned, about 20 to 25 minutes. Rotate the baking tray by 180 degrees, midway, to ensure even heating.

You can store these cookies in an airtight jar for almost a week, and they'll stay nice and fresh. Its a great way to get some good vitamins and fiber into your toddler's body by means of fruits and flour. A guilt-free treat that is perfect for mommy and baby!

Related Recipes
Soft & Chewy Oatmeal Raisin Cookies
Heart-Healthy Buckwheat Cookies
No-Bake Thumbprint Cookies
11:15 AM | 0 comments | Read More

Baking Christmas Cookies For Santa

Written By Unknown on Wednesday, December 8, 2010 | 11:36 AM

christmas cookies

My mom was an amazing baker-extraordinaire, and most of my favorite childhood memories revolving around Christmas involve baking cookies. It never got old, and whether we were decorating melt-in-your mouth sugar cookies with piping of all colors and styles or gluing on the perfect accessories to our gingerbread men, I loved it. It formed a bond with my mom that we will both cherish forever. Even now, 20+ years later, when December hits, all I want to do is go home, turn the Christmas music up, the oven on, and bake cookies with mom.

Part of the intrigue after the piles and piles of cookies were baked and decorated to child-like perfection was the finale: when we got to create a plate for Santa. Of course, Santa can eat everything and multiples of it, so we always had a giant plate and we put at least two of everything we had made on that plate. I was very protective of those cookies. No one (especially not a sneaky brother) was going to touch any one of them. They were for Santa and Santa alone. And, first thing Christmas morning, it was a mad dash to make sure that Santa had eaten them all, drank his milk and left just the appropriate amount of crumbs behind. He never failed me.

This year, I encourage you to bake cookies with your children. What better way to spend a Sunday afternoon than in your kitchen with flour flying and little fingers dipped in red sugar crystals? Play some of your favorite music and show your kids a new kind of Christmas magic. I guarantee that you won’t forget it and neither will they. And, after all, do you really think Santa prefers homemade cookies or those pre-packaged, cardboard cutouts? I’d venture to say he’d rather your child’s attempt at a cookie (regardless of what it tastes or looks like) than anything else.

If you’re at a loss for where to start, try the sugar cookies above. It’s a very simple recipe that my mom and I are both in love with. It’s called a sugar cookie, but don’t let that fool you. It’s got sour cream that makes it to-die-for, and I’d describe it somewhere between shortbread and sugar cookie. Plus, while the mixing and baking is fun, there’s something about decorating cookies after that I believe absolutely every child should be a part of. P.S. Don’t forget the milk!

Here are some more Christmas Cookie recipes that Santa will love!

Perfect Shortbread Cookies
Peppermint & Vanilla Butter Cookies
Raspberry Blondies (Cookie Bars)
Chocolate Marshmallow Mud Cookies
Snowflake Sugar Cookies
Pink Meringue Cookies
Chocolate-Dipped Madeleines

This article is written by Tara Alley, who is a freelance writer from Big Sky, MT, a passionate baker and a lover of all things coffee-related. She is now living in the heart of Orange County, CA, working for Coffee Home Direct, promoting coffee makers and coffee accessories. You can reach her at: tara@coffeehomedirect.com.
Photo: iStockPhoto.com
Recipe: Allrecipes.com

11:36 AM | 0 comments | Read More

Chocolate-Kissed Walnut Cookies

Written By Unknown on Wednesday, September 23, 2009 | 10:09 AM

Chocolate walnut cookies
Sometimes one wishes to indulge into a little sweet treat, but at the same time, its nice if one can make something that takes very few ingredients, and less time to prepare, yet can satisfy your craving. On a cold Saturday afternoon, that's precisely what I felt. I was bored, and wanted to bake something simple. SO I opened my pantry and the first thing I saw was a bag of walnuts gawking straight at me. SO I picked it up, and went for the quintessential all-purpose flour, sugar and butter, and decide to bake these simple yet beautiful and crunchy walnut cookies. With less than 5 ingredients, it is indeed one of the most easy recipes, with an end product that is sure to delight you and your family! I just added some chocolate topping to give it that extra zing!

I'm sending these to Aparna who's hosting this month's Monthly Mingle featuring High-Tea Treats! Hope she likes them:)

Ingredients
Makes about 18-20 cookies

1 cup all-purpose flour
1/2 cup ground walnuts
4 oz butter - at room temperature
1/4 cup sugar
Hershey's chocolate syrup

Method
Preheat your oven to 350 deg F. Line two baking sheets with parchment paper and set aside.

In a bowl, cream butter with sugar until light and fluffy, about 7-8 mins.

In another bowl, whisk together the flour and ground walnuts and add to the creamed butter mixture. Mix until well combined to form a soft dough. Do not knead a lot as this can get pretty sticky. Use some all-purpose flour for dusting.

Now refrigerate the dough for 30 minutes. This makes is easier to shape the cookies.

Take a teaspoonful of dough in your hand, form a small ball, and press lightly in the center with your finger to make a shallow hole (use light pressure with your thumb or index finger). You can even roll out the dough to make a big 1/2 inch thick round, then use a cookie-cutter to make smaller cookies.

Arrange the cookies on the baking trays, 2 inches apart. Leave enough space as they will spread a bit as they bake. Bake for 15 minutes, until the edges are slightly colored and the cookies look firm.

Let the cookies cool completely on a wire rack, then you can store them in an air-tight container. Right before serving, fill the holes with Chocolate syrup. Or, you can fill the holes with melted chocolate ganache, then refrigerate them till it solidifies, and store in an airtight box for a few days.
10:09 AM | 0 comments | Read More

Chewy M&M Cookies

Written By Unknown on Monday, April 20, 2009 | 5:20 AM

chewy-m&m-cookies
If there are any cookies I like after chocolate-flavored ones, it has to be the classic fat and thick M&M Cookies. They taste lovely, and yet cater to the child within you because of the colorful use of M&M's! I first saw these cookies on Delish, which are adapted from the recipe in the beautiful cookbook called The Cookie Bible, with M&M's and ground pecans, but I'm sure you could easily use chocolate-chips or other nuts. Its a great way to bake goodies with kids or have some fun family time together. With hardly any special ingredients needed, these fat and chewy M&M Cookies will surely leave you mentally and gastronomically happy!

Ingredients
Yields about 3 dozen cookies

2 cups all-purpose flour
1/2 tsp baking soda
1/4 tsp salt
1/2 cup butter, softened
3/4 cup packed light brown sugar
1/2 cup granulated sugar
1 tsp vanilla extract
2 eggs
1 1/3 cup M&M’s, divided
1 cup chopped pecans - coarsely grounded in mixer

Method
Heat oven to 350°F. Line a cookie sheet with parchment paper and keep ready.

Stir together the flour, baking soda and salt; set aside. Beat butter, brown sugar, granulated sugar and vanilla in a large bowl until well blended. Add eggs, one at a time, and beat well.

Gradually add flour mixture, beating until well blended. Stir in 3/4 cup M&Ms and all the chopped nuts. Drop by rounded teaspoons onto cookie sheet, leaving enough space in between to let them expand. Press 5-6 of remaining M&Ms on each cookie before baking.

Bake for 9-11 minutes or until lightly browned. Cool slightly, then remove from cookie sheet and allow to cool completely on the wire rack. Eat a few immediately, storing others in air-tight containers for later:) This is a great alternative to brownies, as a picnic dessert too!

Related Recipes
Chocolate-Dipped Madeleines
Thumbprint Cookies - Vegan
Chocolate Peanut Butter Bars
5:20 AM | 0 comments | Read More

Chocolate Nutella Cookies

Written By Unknown on Monday, January 26, 2009 | 6:01 AM

chocolate-hazelnut-cookies
Can you imagine the divine taste of Nutella, all wrapped up in a dark chocolate layer and packaged as a decadent cookie?? If you haven't started salivating already, I'm pretty sure you will, as soon as you lay your hands on these truly delicious Nutella Chocolate Cookies! After devouring endless Nutella crepes in our recent trip to France, I thought it would be great to bake some cookies with Nutella! and of course, there can't be christmas cookies without chocolate, at least for me, so I combined my two favorite ingredients and set forth to bake these decadent Dark Chocolate Nutella Cookies, that are crunchy to eat, and yet melt in your mouth as soon as you start savoring one!

I'm sending these to Susan at Foodblogga for her Eat Christmas Cookies event. Check out all the other delicious entries up here! This also goes to Santa's Holiday Challenge at Tasty Treats, as well as Cookie Baking event over at Neivedyam!

Ingredients
makes 16-18 small cookies
1/4 cup butter
1/3 cup sugar
1 1/2 cups all-purpose flour
1/2 tsp baking powder
1/4 tsp salt
1/2 cup semi-sweet dark chocolate chips
3 tbsp Nutella chocolate-hazelnut spread
2 tsp finely ground hazelnut powder

Note: I didn't exactly measure my Nutella spread while making these, so I might be a wee bit off in the measurement list. So if you feel your dough is a little soft to handle, just refrigerate it for a couple hours as suggested, and the cookies should turn out fine.

Method
Preheat oven to 350 deg F. Line a baking sheet with parchment paper and keep aside.

Melt the dark chocolate chips in a microwave-safe bowl by heating and stirring for 1 minute, in 20-second intervals. Allow it to cool a little.

Beat butter and sugar until creamy, then beat in the Nutella spread. Add the flour, baking powder, salt and stir until combined.

Add the melted dark chocolate and the ground hazelnut powder and mix well.

If the dough looks a bit clumsy to handle, wrap it in a cellophane paper and refrigerate for about 10 mins. This will make it easier to shape into cookies.

Now shape the dough gingerly into small round cookies, or drop them using rounded spoons on the baking sheets, about an inch apart from each other. Press gently with the backside of a fork if you like.

Bake for about 10 minutes, until dark brown in color or until the edges are just set. Let cool on cookie sheets for about 2 minutes. Then remove and cool completely on wire racks.

Related Recipes
Coconut Cookies with Vanilla Icing
Peppermint & Vanilla Butter Cookies
Fat & Chewy Chocolate Chip Cookies

6:01 AM | 0 comments | Read More

Coconut Cookies with Vanilla Icing

Written By Unknown on Monday, June 2, 2008 | 6:14 AM

coconut cookiesI've always been a fan of Coconut Macaroons or Coconut Cookies, and it was finally time to start the oven and bake some cookies over the weekend. Starting with the simpler of the two, I opted for Coconut Cookies, which are similar to the macaroons, except that they are a lot more easier to make! Just to add some glamour, I decided to add a simple vanilla icing on the top. The cookies came out great; and with the perfect balance of sweetness and taste of coconut, these cookies did not survive in the jar as long as I had imagined they would! They came out chewy, yet not too much, and have a wonderful texture due to the toasted coconut adding a wonderful aroma as well as the texture. To kick things up a notch, just use some vanilla or flavored icing and drizzle it onto the cookies to transform these simple coconut cookies into something more suited to a festive occasion.

Ingredients
1 cup all-purpose flour
1/2 tspn baking soda
1/4 tspn salt
1/2 cup butter
1/2 cup packed brown sugar
1 egg
1/2 tspn vanilla extract
1 cup flaked coconut
1/2 tsp coconut essence (optional, but recommended)
ready-made icing - as required

Method
Preheat oven to 350 degrees F (175 degrees C.) Combine the flour, baking soda, and salt and set aside.

Take 1 tbsp butter, melt it a little, then add the shredded coconut to it. Saute lightly to get a golden, toasted look and aroma. Divide into 2 parts and keep aside.

In a medium bowl, cream the butter and brown sugar until smooth. Beat in the egg and vanilla and coconut essence until light and fluffy. Gradually blend in the flour mixture, then mix in half of the toasted coconut to it.

Cover with a plastic wrap and freeze the dough for 10-12 mins.

Take a little dough at a time, grease your palms with oil and roughly shape the dough into a cookie. I like the corrugated edges in my cookies so I use this method. You can even use a long fork to make some marks on the cookies for a fancier effect. Instead, you could even drop dough by spoonfuls onto an ungreased cookie sheet.

Roll each cookie dough in the remaining shredded coconut, or simply sprinkle a little on the top. Place the cookies about 3 inches apart on the baking sheet.

Bake for 5-8 minutes in the preheated oven, or until lightly toasted. Then turn the cookie sheet around by 180 degrees and bake for another 5 mins until lightly browned on the top. Cool on wire rack till completely cool.

For the icing, take the ready-made icing and add 1 tsp of vanilla essence. You could even use lemon zest or orange zest for a delicate flavor. Use a piping bag with a thin hole (about 2mm) then gently pipe the icing on the cooled cookies in any pattern you want.

You can store the coconut cookies in an airtight container (without icing) for about 20 days. As the cookies themselves are not very sweet, the icing adds a nice touch though.

These coconut cookies are on their way to Suganya who's hosting AFAM-Coconut this month!

These Coconut Cookies with Icing are a wonderful treat any time of the day. Without the icing, they taste like coconut macaroons, albeit a bit less sweet; with the icing, they are fancy enough to be served to guests at a tea-party, and I think I'm going to try orange icing next time!

Similar Recipes:
Chewy Chocolate-Chip Cookies
Thumbprint-Jam Cookies
Eggless Almond Cookies (Nankhatai)

6:14 AM | 0 comments | Read More

Fat and Chewy Chocolate Chip Cookies

Written By Unknown on Thursday, March 27, 2008 | 8:01 AM

Cookies are cherished by kids and adults alike, and the best part is that you can always use a basic cookie recipe, throw in any of your favorite ingredients into the dough and bake them into something delicious! Whether its a special occasion, a holiday celebration, or just a desire to gaze a a jar full of cookies, these tiny treats are a neat way to watch your calories without giving up your cravings! But ask 10 people what's their favorite cookie recipe and 9 out of those 10 would unsurprisingly say "Chocolate Chip Cookies"!! As a matter of fact, they seem to be my favorites too, and I've been trying to master the recipe for those perfect chocolate-chip cookies which are fat and chewy, rich and gooey, and baked to a golden-brown color. Looks like I have finally found what I sought - this is the best recipe for baking the classic chocolate chip cookies at home. Try it and see for yourself.

I opted for the traditional semi-sweet chocolate chips, but you can substitute white, milk chocolate, or peanut butter chips for them in the recipe. I also threw in some raisins as I love them in my cookies. Nuts, M&M's or shredded coconut could be other nice variations.

The recipe below yields about 18-20 medium cookies

Ingredients
2-1/2 cups all-purpose flour
1 cup firmly packed brown sugar
1 cup unsalted butter, divided use
1 cup semi-sweet chocolate chips
2/3 cup raisins (optional)
3/4 tspn baking soda
1/2 tspn salt
1/2 cup granulated sugar
1 tspn vanilla extract
2 large eggs

Method
Preheat oven to 350 degrees F. Line baking sheets with parchment paper or nonstick cooking spray.

In a medium sized mixing bowl, sift together flour, baking soda, and salt.

In an electric mixer fitted with the paddle attachment, cream the butter and sugars. Add eggs, one at a time, mixing well after each addition. Reduce speed to low and add the flour mixture, vanilla, and chocolate; mix until just combined.

Now cover the dough and refrigerate for 20-30 minutes. This just makes it easier to handle and shape into cookies.

Take a scoop from the dough and use your palms to shape into cookies, then line them on the prepared baking sheets, about 2 inches apart. Bake until lightly browned, but still soft, about 15 minutes.

Cool slightly on baking sheets before transferring to a wire rack to cool completely.

These chocolate-chip cookies are truly decadent, fat and chewy, just as I like them. They can be stored for about a fortnight in an air-tight container.
8:01 AM | 0 comments | Read More

Marshmallow-Chocolate Mud Cookies

Written By Unknown on Thursday, January 24, 2008 | 1:18 AM

That chocolate chunks go best in cookies is a well-known fact, but another such ingredient which enhances the flavor of cookies is Marshmallows. Yes, that tiny white, soft and chewy ingredient that imparts taste and texture to your cookies! Mud Cookies are traditionally loaded with chocolate, both dark and white, and are baked a little more than regular cookies to give them the dark brown mud-like color. But don't go by the comparision to mud - it ends in the name!! The double chocolate mud-cookies are very tasty, not too sweet, and make for lovely goodie-boxes for the festive season!

Recipe and Image Source: Southern Living

Ingredients
1 cup semisweet chocolate chips
1/2 cup butter, softened
1 cup sugar
2 large eggs
1 tspn vanilla
1-1/2 cups all-purpose flour
1 tspn baking powder
1/2 tspn salt
1 cup chopped pecans
1/2 cup milk chocolate chunks
1 cup mini marshmallows (optional)

Method
Microwave semisweet chocolate morsels in a small microwave-safe glass bowl at HIGH for 1 minute, stirring every 30 seconds. Beat butter and sugar at medium speed with an electric mixer until creamy; add eggs, 1 at a time, and beat well. Finally blend in the vanilla and melted chocolate.

Combine flour, baking powder, and salt and pass it through a sieve. Add this slowly to chocolate mixture, continuously stirring until well blended. Stir in the chopped pecans and 1/2 cup milk chocolate chunks.

Now take a baking sheet lined with butter paper. Spoon two tbsp of the dough onto the paper sheets. Press 3 marshmallows into the center of each cookie dough.Preheat oven to 350° and bake for 10 to 12 minutes or until set. Remove and allow to cool on the wire rack.

Store in an air-tight container and enjoy these lovely cookies anytime of the day. These marshmallow-chocolate chip cookies taste great with plain milk too! So next time your kid throws a tantrum while drinking milk, add a cookie to his glass and see him lick it to the last sip:)

Update (01/24/08): This photo had been wrongly submitted to DMBLGIT and I apologize for the mistake and any inconvenience caused thereof.
1:18 AM | 0 comments | Read More

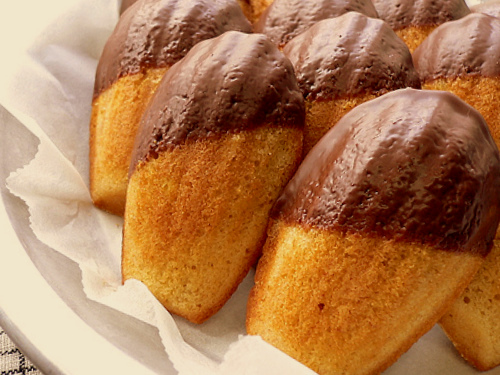
Chocolate-Dipped Orange Madeleines (French Cake-like Cookies)

Written By Unknown on Friday, November 30, 2007 | 10:13 AM

"Madeleines" are a famous bunch of french cookies, that have spread their magic around the world. The French are known for their love of food, exquisite desserts, their romanticism, and their perfumes. They tend to be exotic in whatever they do, and so there's no doubt you'll see a similar touch in their cuisine too!! "Madeleine" is a french name for Magdalen (Mary Magdalen - The Holy Grail from the Da Vinci Code, ring any bells??) There are several legends attached to these delicious cookies with a unique shape and taste, one of them being that Madeleines come from the little French town of Commercy, whose bakers were said to have once, long ago (18th century), paid a "very large sum" for the recipe of these little cakes which became a specialty in the area. Commercy once had a convent dedicated to St. Mary Magdelen, and the nuns there supported themselves and their schools by making and selling cake-like cookies, and historians believe that when all the convents and monasteries of France were abolished during the French Revolution, they were forced to sell their recipe to the bakers. There have been several other stories, but whatever may the truth be, aren't we all glad to have been blessed with these delicious beauties that add so much sweetness to our lives?? So here's to the famous French Madeleine Cookies, and my recipe only make them better by adding a touch of orange flavor and chocolate!!

Ingredients
Makes 24 cookies

1/2 cup (1 stick) butter
1 cup all-purpose flour
1/2 tspn baking powder
A pinch of salt
3 large eggs
3/4 cup granulated sugar
2 tsp vanilla essence
1 tbsp freshly squeezed orange juice
1 tbsp grated orange zest
2 bars (1.5 ounces each) Godiva Dark Chocolate - coarsely chopped
Madeleine Pans (you can buy one online here)

Method
Heat butter in small heavy saucepan over medium heat just until very light golden brown and fragrant, about 5 minutes. Remove from heat and cool to room temperature.

Mix together the flour, baking powder and salt. Beat eggs and sugar in a large bowl with a hand blender until tripled in volume. Lower speed to medium and beat in the vanilla, orange juice and orange zest. Fold in flour mixture a little (1/3rd) at a time. Finally fold in the cooled butter. Cover and refrigerate for 30 minutes or until slightly firm.

Preheat oven to 375°F. Apply butter or non-stick cooking spray to two 12-mold madeleine pans and dust them with flour. Drop a generous spoonful or two of batter into center of each prepared mold, leaving the batter mounded in the center. Bake for 12 to 15 minutes or until edges are golden brown and centers spring back when lightly touched.

Remove the pans from oven and tap them sharply against a countertop to release the madeleines, then leave them to cool on wire racks.

Place chocolate in small microwave-safe cup. Microwave on medium (50% power) for 1 minute or a little more, stirring every 30 seconds, until chocolate has almost melted. Whisk a little to make it smooth. Do NOT overheat.

Dip each madeleine into melted chocolate, coating bottom third part of the cookie. Shake off excess chocolate and place on a baking sheet lined with wax paper. Repeat for all the cookies and leave at room temperature for 1 hour or until chocolate is set.

This is the perfect recipe for Chocolate-covered Madeleines, and beleive me, they are so great you are sure to get addicted to them. Enjoy these as simple desserts, but they are great with tea or coffee too.

Related Recipes:
Chewy Chocolate Chip Cookies
Coconut Cookies with Vanilla Icing
Nankhatai - Eggless Almond Cookies

Related Tags
, , ,

10:13 AM | 0 comments | Read More

Healthy and Low-Fat Blueberry Muffins (Also with Eggless version)

Written By Unknown on Thursday, October 18, 2007 | 10:50 AM

These low-fat Blueberry Muffins are my current friends in my diet plan. People who do not have to do anything special to maintain their healthy weight and slim figure are eternally BLESSED!!! But not all of us are so lucky, and the moment you eat those few extra calories, they start showing themselves on our body! Does this mean you are not supposed to indulge in culinary delights?? Absolutely not! There was a time when dieticians and nutritionists were the only ones who could tell you what should be a part of your healthy diet, but now, thanks to the power of the web and numerous online weight-loss tutorials, having a healthy weight and a figure or physique that you could be proud of is no longer a dream! Here's one such diet-food dessert or snack recipe that I tried when I was on my weight-loss plan - Blueberry Muffins - adapted from one of Denise Austin's recipes, they are not only tasty and filling, but you wouldn't have to think twice about your weight while relishing these!!

Nutrition Info: These low-fat muffins are high in fiber because of the oats, and help you keep satiated for a longer time. They have roughly 150 calories, no carbs, high protein content and around 3 grams of fat. Blueberries are the best source of antioxidants, and as there is very little sugar involved, you can replace it with artificial sweeteners to make a diabetic version of the recipe. For the Vegan version, use water instead of milk. There, with all these variations, it can easily be used as one of your 5 meals a day, though I'd not recommend eating it everyday!:)

Ingredients
3/4 th cup all-purpose flour
1-1/4th cup quick cooking oats or whole wheat flour
1/2 cup sugar (or 1 cup honey)
1 tsp baking powder
1/2 tsp baking soda
1/4 tspn salt
2 egg whites
1/2 cup low-fat milk or water
1/3 cup vegetable oil
1 cup fresh or frozen blueberries (do not thaw them)

Eggless Version: Eggs act as leavening agents and give fluff and texture to baked dishes, so if you use egg substitutes you might have to compromise on the softness a little. However, you can use mashed bananas or mashed silken tofu instead of eggs. Some products like "Ener-G" are available in some markets which are egg replacements and can be used effectively. If the recipe calls for only 1-2 eggs, you can just skip them and use warm whole milk or even Applesauce. Hope this note helps vegans to enjoy this and other such lovely recipes without eggs.

Method
In one bowl, combine the flour, oats, salt, baking powder, baking soda and sugar. In another bowl, beat egg whites, milk or water and oil. Whisk for 5-7 mins till soft peaks are seen. Stir into the flour mixture and mix together; do not beat a lot, just until everything is evenly combined (the batter should be lumpy, not too smooth). Fold in the blueberries gently.

Now take the muffin cups and grease them with cooking spray (try not using oil or butter)Fill each cup upto the 3/4th level. Bake at 400 degrees F for 18-20 minutes or until a toothpick inserted in the center comes out clean. Once done. allow to cool completely, then gently remove from the cups and enjoy these delicious low-fat muffins any time of the day.

These healthy low-fat blueberry muffins serve to be perfect breakfast or dessert treats. Hope this recipe helps to satiate the sweet tooth of many a calorie-conscious diet-lovers out there!!

10:50 AM | 0 comments | Read More

Low-Fat Healthy Cranberry and Pistachio Biscottis

Written By Unknown on Monday, October 15, 2007 | 4:04 PM

As humans start to grow old, many of our organs can't seem to keep up with the stress of age, but unfortunately, our taste buds never get old. They are always craving for something tasty, be it sweet, spicy or savoury, and often it becomes a challenge to cook food that is healthy and tasty. But I think my Low-Fat Cranberry-Pistachio Biscottis are a perfect way to enjoy some sweet with your tea or coffee, without feeling guilty about all that fat!

Ingredients
1 roll of parchment paper (or butter paper)
2 egg whites
1/2 cup sugar (or sweeteners if you are diabetic)
1/2 cup all-purpose flour
1/2 cup wheat flour
2 tsp baking powder
1 tbsp olive oil
4 tbsp milk
1/3 cup shelled pistachios - sliced
a fistful of dried cranberries (or chocolate chips for a variation)
1/2 tspn vanilla essence

Note: This is a healthy version of the recipe, so you might have to compromise on the softness a bit. If you are looking for a cake-like richness in the biscottis, use whole eggs(with the yolk) and instead of olive oil, add 1/4th cup butter.

Method
Preheat oven to 350°F and line a baking tray with parchment paper.

In a large bowl beat egg whites with a pinch of salt until they just hold stiff peaks. Gradually beat in the sugar while constantly mixing it.

Sift both the flours and baking powder. Add this to the egg white mixture and whisk.

Blend in the olive oil, milk, nuts and cranberries and beat till stiff peaks are formed and mixture holds its shape. Finally fold in the vanilla gently.

Transfer the mixture into loaf pan baking sheet forming a log-shaped bar with the dough. Smooth the top with hands and a flat butcher's knife and bake in middle rack of the oven until golden, about 25 to 30 minutes.

Now allow the baked loaf to cool down for 10 mins. Then slice it into biscotti-sized thick bars. Reduce temperature to 300°F.

Place the biscotti, cut side down, on the baking sheet. Bake 10 minutes, then turn the slices over, and bake for another 10 minutes or until golden brown. Remove from oven and let cool. Store in an airtight container.

These biscottis are low in fats, and even the fat it contains is good for the heart, coming from olive oil. This recipe does not use any butter or margarine, and also eliminates the high-fat content found in egg yolks. The egg whites provide necessary protein, milk and olive oil impart softness, while nuts and cranberries provide healthy anti-oxidants, proteins and omega-3 fatty acids which all aid in keeping your heart healthy. So enjoy these healthy cranberry biscotti without any guilt!!

Similar Recipes:
Cranberry-Soy Milk & Green Tea Smoothie
Healthy Cranberry-Walnut Scones

4:04 PM | 0 comments | Read More

Almond Cookies (Eggless Nankhatai)

Written By Unknown on Wednesday, September 26, 2007 | 10:53 AM

Cookies are a top-rated snack food, and every household, especially with kids, is bound to have a jar filled with cookies. One such type of cookie famous in India is called "Nankhatai". It can be made salty and spicy, or sweet and soft. It is best enjoyed with tea, but beleive me, these tiny tots are so tasty and mouth-watering your hand would reach out for them any time of the day! Here's a recipe for Almond Cookies or Eggless Nankhatai which I adapted from my sister-in-law's version. It does not use eggs, yet is soft and chewy. Her kids love these cookies, so I'm sure it'll be a hit with your kids too!!

Ingredients
2 cups All-purpose flour (Maida)
1 cup powdered sugar (or adjust to taste)
1/2 cup butter or ghee (at room temp, or melted)
2 tbsp baking powder
3 tbsp milk powder
12-15 pieces of almonds - slit in halves, skin removed (you can even use peanuts)
4 tsp almond essence (you can use vanilla if almond is not available)
Cookie cutter (optional)

Method
Heat the oven to 350° F. Lightly coat a large baking tray with butter and dust with all-purpose flour and set aside.

Sift the flour, baking powder, and milk powder in a mixing bowl. Beat the butter and sugar in a separate bowl till it is light and fluffy. Fold in the flour mixture into this and whisk again, in the same direction until it is smooth. Finally add the almond or vanilla essence. Remember, this will not be as liquid as your cake dough. Cookie dough is supposed to be firmer so that it can easily form shapes.

Now take some oil and grease your plams. Divide the dough into 12 equal portions, then flatten the dough and form a circular shape with your palms. Keep pressing the edges to form a smooth cookie. Alternately, you can use a cookie cutter or mould if you are more comfortable with it. Pinch a small almond in the center of the cookie, and add the almond or peanut into it. Make all the nankhatais in this way and arrange on the baking tray, at least 1-2 inches apart. Bake them for 10-15 mins, or until done. Do not overbake as that would make them hard and burnt!

Remove from the oven, let them cool down to room temperature, then store them in an air-tight container. You can even refrigerate them for a longer period. Just warm them in the microwave for 10 secs before serving. Savour these simple and delicious almond cookies or nankhatai as it melts in your mouth!!

More Cookie Recipes:
Peppermint and Vanilla Butter Cookies
Fat and Chewy Chocolate-Chip Cookies
10:53 AM | 0 comments | Read More